Friday, November 4, 2016

Full join in Talend

Full join in Talend


Introduction:

There is no shared idea or pre-defined solution to achieve Full join in Talend. Hence I am sharing my idea.

What need to be achieved using Full Join?

Consider the below RecordSet,

Table1

EmpId
EmpName
Salary
ID1
Emp1
15000
ID2
Emp2
16000
ID3
Emp3
17000

Table2

EmpId
Emp_AGE
EmP_Address
ID1
25
Chennai
ID2
35
Bangalore
ID4
30
Chennai

If you notice, Table1 does not contain data for ID4 and Table2 does not contain data for ID3.

The result-set that we need to get using Full Join is 

EmpId
EmpName
EmpSalary
EmpAge
EmpAddress
ID1
Emp1
15000
25
Chennai
ID2
Emp2
16000
35
Bangalore
ID3
Emp3
17000


ID4


30
Chennai

How to achieve Full Join?

Follow below steps to achieve Full Join,

Step 0: Consider the below two tables (Temporary data creation)

Table1
Table2


Step 1: Store the record-set in Hash components

Fetch data from two tables and store each record-set into separate tHashOutput component as shown below,

Table1


Table2

Step 2: Map dataset in Table1 and Table2 

Map data that is stored in tHashOutput_1 and tHashOutput_2 with Table1 data as Main table and Table2 data as LookUp table in tMap component.

Mapping in tMap,

Step 3: Store the output in tHashOutput

Store the output which contains data from Table1 as Main table and Table2 as LookUp table.


Step 4: Follow Step 2 and 3 with Table2 as Main table and Table1 as LookUp table

See below image for mapping,

Step 5: Merge two result-sets and get unique records

Now merge two result-set using tUnite component and get the unique records using tUniqueRow component.


Final output:


Reference:

Wednesday, May 18, 2016

Another simple way to remove duplicate data

Purpose:

In my previous blog, I have explained a way to avoid duplicate records. Here I am with a simple query to achieve the same.

SELECT DISTINCT column1, column2, column3, .......

FROM tablename;

                                                              OR

SELECT column1, column2, column3,....
FROM(
     SELECT COUNT(1) count_value, column1, column2, column3, .......
     FROM tablename
     GROUP BY column1, column2, column3, .......);


                                                              OR

SELECT column1, column2, column3, .......

FROM tablename
GROUP BY column1, column2, column3, .......;


If you notice the sub-query contains COUNT(1), which is not in the main query.

How this query avoids duplicate?

Follow the below approach to avoid to the duplicate in records or delete duplicate records.

Consider the below Table "Employee" which has two duplicate records


EmpId
EmpName
Salary
1
AAAA
20000
2
BBBB
30000
2
BBBB
30000
3
CCCC
25000
4
DDDD
20000
4
DDDD
20000

SELECT COUNT(1) count_value, EmpId, EmpName, Salary
FROM Employee
GROUP BY EmpId, EmpName, Salary;

The above query will return the below result


count_value
EmpId
EmpName
Salary
1
1
AAAA
20000
2
2
BBBB
30000
1
3
CCCC
25000
2
4
DDDD
20000

It is clear from the above query that EmpId 2 and EmpId 4 has duplicate records.

So with the above query, we can able to group the duplicate records.

Now create a temporary table of the same schema and insert data into that temp table using the below query


INSERT into Employee_temp 
SELECT EmpId, EmpName, Salary
FROM(
     SELECT COUNT(1) count_value, EmpId, EmpName, Salary
     FROM Employee
     GROUP BY EmpId, EmpName, Salary);


                                                                     OR
INSERT into Employee_temp 
SELECT EmpId, EmpName, Salary
FROM Employee
GROUP BY EmpId, EmpName, Salary;

                                                                     OR
INSERT into Employee_temp 
SELECT DISTINCT EmpId, EmpName, Salary
FROM Employee;


Now the temp table will have unique data as below


EmpId
EmpName
Salary
1
AAAA
20000
2
BBBB
30000
3
CCCC
25000
4
DDDD
20000

Now drop the Employee table and Rename the Employee_temp table to Employee.

Note: This query will not work for the below records, if you need all the columns.


EmpId
EmpName
Salary
Department
1
AAAA
20000
Dept1
2
BBBB
30000
Dept1
2
BBBB
30000
Dept2
3
CCCC
25000
Dept2
4
DDDD
20000
Dept2
4
DDDD
20000
Dept3

If you note this, the department for EmpId 2 and EmpId 4 are different in both the records.

If you do not need the department column, then this query will work.

Hope this should avoid duplicate records or delete duplicate records.

Efficient usage of upload of multiple files to Amazon S3 bucket and parallel copying of those file data into Amazon RedshiftDB

Introduction:


          In this blog, let we discuss about some interest topic that how to upload multiple files into Amazon S3 bucket efficiently and faster using Talend Open Studio. Then we can see about how to copy data from those multiple files into multiple Amazon Redshift DB tables efficiently and faster using Talend Open Studio.

Purpose:

I have already discussed about transferring data from MySQL database into Amazon Redshift database using Amazon S3 bucket in my previous post. Check this out first.

Suppose imagine a scenario where I need to transfer data from 100 tables in MySQL to 100 tables in Redshift and each table has, say 1 million records.

To do this, the below process has to be done 100 times.


Obviously this process has to be under taken 100 times. But the question here is that, do we need to do this as parallel process or sequential process ?


Of  course, we know that, doing sequentially takes much time.

So parallel processing is the best way to achieve it faster.

How to do it?

Below is an approach to achieve this using Talend Open Studio

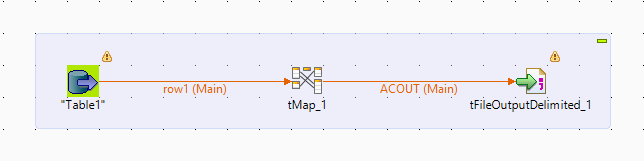
Step 1: Job to generate files

The first step that we have to do is we need to create job or jobs to generate files that need to be uploaded to Amazon S3 bucket. (JobName: GenerateFile)

The job can be single or multiple which is based on your requirement. To create a single job that has dynamic schema, Refer this.

The job reads data from MySQL table and generate a CSV file.


The file name and file path can be set dynamically based on the context variables as shown in the above image.

Step 2: Upload files to S3 bucket

The next step is to create a single job to upload the generated files to S3 bucket. (JobName: UploadFile)


This job will upload the generated file to the provided S3 bucket.


The source file path and the target file path can be set dynamically based on the context variables.

Step 3: Copy the file data to Amazon Redshift tables

Third step is to create a single job to copy the file data to redshift tables. (JobName: CopyFile)


This job will copy the data from file into redshift table.


The copy query can be dynamically generated as show in the above image. The table name and file name can be dynamically set with the context variables.

Step 4: Call generate file job 20 times simultaneously 

Now we have all the three jobs that has to be run simultaneously more than 1 time. So how to call the job more than once simultaneously? Below is the example job (JobName: GenerateFileIntermediate)

The job contain 20 tRunJob component which call the same job with different context variables.


If you notice, each component has a parameter named TableName, which is a context variable, and that parameter value will be differ on each component.

Step 5: Call upload file job 20 times

Create a job that contains 20 tRunJob component and each component call the upload job. (JobName: UploadFileIntermediate)


Each component can contain different parameter value.


Each component has different value for parameter TableName as shown in above image.

Step 6: Call Copy job 20 times

Create a job to call the copy job 20 times. (JobName: CopyIntermediate)

If you noticed, I made only 10 jobs run simultaneously and the other 10 jobs as sequential jobs. This is because, the 10 parallel job is based on the number of child core in your redshift cluster. If your cluster has only 6 then split the jobs as 6 rather than 10.


Each tRunJob component will have different parameter value as in the above image.

Step 7: Final job

Now create the final job which is the master job that invoke other jobs.


If you notice, the GenerateIntermediate job is called first, which in-turn call GenerateJob 20 times. When generate 20 files is finished, the UploadIntermediate job is invoked, which call UploadJob 20 times. Then CopyIntermediate job is called, which calls CopyJob 20 times.

Conclusion:

The concept here is that, separate job is created for generating file, uploading file to S3 and copying data to redshift tables. Then those each jobs are called multiple time with different parameters and finally the master job which calls the parallel job.

By this method we have achieved the efficient usage of parallel processing in Amazon S3 and Amazon Redshift.


Monday, January 25, 2016

Datetime sent by Talend component and Datetime received in MySQL Stored Procedure are not same

Purpose:

I have created a job that picks a datetime from Redshift and send that datetime to MySQL SP. My expected result was not achieved. Then I figured out that the datetime sent by component tMysqlSP is different from the datetime received at MySql Stored Procedure. I solved the issue as below.

Problem is :

Talend send DateTime, say 2016-15-01 04:28:09 to SP. But the SP receives 2016-15-01 00:00:00.

Solution:

I made Talend component to send String rather than DateTime, i.e., I sent "2016-15-01 04:28:09" rather than 2016-15-01 04:28:09.